
Nothing ruins a spring breeze faster than wrestling a flimsy, ill-fitting window screen into a frame that clearly wasn’t built for it. You know the scene: it’s the first warm Saturday morning in months, you’ve got your coffee, you’re ready to air out the house after a long winter, and there you are, bent over the window frame, muttering words your neighbors probably shouldn’t hear, trying to jam a screen that’s somehow both too big and too small at the same time. It’s the Goldilocks problem of home maintenance, only there are no bears coming to save you, just a frustrating trip back to the hardware store and a receipt you’ll probably lose before the return period ends.
Before you rage-order the wrong size online (we’ve all been there), grab a tape measure, because getting the right fit is easier than decoding your smart thermostat. In fact, the average homeowner spends 45 minutes wrestling with incorrect screen sizes before admitting defeat, according to hardware store veterans. But here’s the good news: once you master the ⅛-inch rule and learn to speak the language of screen frames, you’ll never waste another weekend on returns. This is the kind of small, satisfying home win that makes you feel like you have your life together even if the rest of the house is still a work in progress.
📦 SMART HOME INFO BOX
Upgrade Type: Home Maintenance & Energy Efficiency
Best For: Homeowners, renters, and DIYers who love saving money on service calls
Budget Range: $15–$50 per screen when you DIY vs. $75–$150 for professional installation
Main Benefit: Perfect-fitting screens that maximize airflow while keeping bugs, pollen, and debris out—without the 300% markup
Editor’s Tip: Create a “window log” in your phone notes with measurements for every screen in your house. Future you will thank present you when mosquito season hits and you’re ordering replacements from the comfort of your porch swing.
Why a Flawed Measurement Will Haunt You (And Your Wallet)
Here’s the thing about window screens: they’re one of the only home components where “close enough” is actually the enemy of “perfect.” Unlike that wobbly side table you can shim with a folded napkin, a screen that’s off by even 1/16 of an inch either won’t fit at all, or it’ll fit so poorly that it bows, gaps, or falls out during the first gust of wind. And that 1/16-inch miscalculation? It’ll cost you $30 in shipping both ways when you realize the custom-cut aluminum frame you special-ordered is about as useful as a screen door on a submarine.
The window screen industry operates on what contractors call the ⅛-inch rule, and it’s non-negotiable. Metro Screenworks, one of the largest custom screen manufacturers in the U.S., explicitly instructs DIYers to subtract exactly 1/8 inch from their channel measurements to account for seasonal expansion . During hot summer months, aluminum frames can expand by nearly 1/16 inch, and that seemingly tiny shift is enough to turn a snug fit into a stuck nightmare. In winter, they contract, leaving gaps where determined June bugs stage their invasions.
Quality Screen Company backs this up with their own guidance: they manufacture to a tolerance of ±1/16 inch, which sounds precise until you realize your window frame might be out of square by twice that amount . The real kicker? Most hardware stores won’t accept returns on cut-to-size screens. Once that blade slices through the aluminum, that $45 frame is yours forever, even if it’s a quarter-inch shy of fitting.
I learned this lesson the hard way when I tried to shortcut the process by measuring my old screen instead of the frame. The existing screen had a subtle bow from years of tension, which added a full 3/16 inch to the width. When my replacement arrived, it bowed dramatically in the opposite direction, creating a gap large enough for a determined squirrel to investigate. That’s the kind of expensive frustration that turns a simple Saturday project into a two-week saga of phone calls, email chains, and uploading photos to customer service portals that time out before you can hit send.
Your 5-Minute Shopping List
Before you even think about climbing that ladder, let’s gather your tools. This isn’t a job that requires a garage full of power equipment in fact, the beauty of screen measurement is its simplicity. You probably have everything you need already, but if you’re the type who likes an excuse to browse the tool aisle (and who isn’t?), here’s your excuse to upgrade.
The Essentials:
- Tape measure with 1/16-inch increments: Your standard contractor’s tape works, but if you’re squinting at blurry lines, treat yourself to a digital readout model like the eTape16. It eliminates guesswork and stores your last measurement, which is handy when you’re balancing on a stool trying to write numbers down.
- Notepad and pencil: Yes, your phone’s notes app works, but screens and smartphones don’t mix well. One wrong move and your $1,000 device becomes a window casualty. A waterproof field notebook like Rite in the Rain costs less than a fancy coffee and survives being dropped in the hydrangeas.
- Smartphone camera: Not for notes, for photos. Document everything: the screen in place, the hardware clips, the spring placement. You’ll reference these later when you’re staring at a pile of parts wondering which side faced up.
The Pro Upgrade:
- Digital caliper: If you’re measuring spline depth (the little rubber cord that holds the mesh), a $25 digital caliper from iGaging gives you precision to 0.001 inch. Overkill? Maybe. Satisfying? Absolutely. It also doubles as a conversation starter when guests see it in your junk drawer.
- Magnetic level: Most window frames sag over time. A tiny bullet level helps you identify if your channels are true. If they’re not, you’ll need to measure multiple points and use the shortest dimension.
Editor’s Pro Tip: Keep a dedicated “window bag” a gallon freezer bag with your tape measure, pencil, notebook, and a small magnetic level. Store it in your laundry room or utility closet. The next time a screen gets damaged, you’re ready to measure in under two minutes instead of spending 20 hunting for tools.
Is Your Screen a Slider, Double-Hung, or Something Else?
Not all window screens are created equal, and treating them like they are is the fastest path to measurement misery. Before you extend that tape measure, you need to understand what you’re working with. Think of it like diagnosing your coffee machine, you wouldn’t descale an espresso maker the same way you’d clean a drip pot.
Single/Double-Hung Windows: These are the most common in homes built before 2000. The screen mounts on the outside and is held in place by tension springs at the top and a lip or ledge at the bottom. When you measure these, you’re measuring the outside dimensions of the screen frame itself top, middle, and bottom, and using the shortest width. The springs add about 1/8 inch of wiggle room, which is why you’ll subtract that from your height measurement.
Horizontal Sliders: Common in mid-century modern homes and apartments, these screens slide horizontally along a track. They’re trickier because they often have rollers or guides that can be hidden in the track. You’ll need to measure the channel width the space between the tracks rather than the screen frame. These often require a screen that’s slightly undersized to slide smoothly, which is why the 1/8-inch subtraction rule is critical here.
Casement and Awning Windows: These crank outward and typically use clip-mounted screens on the interior. The screens are often smaller and may have unique corner brackets. For these, measure the visible frame dimensions where the clips attach, not the overall size. If you have these, you’re probably in an older home or a high-end modern build, congratulations on your architectural taste, but double-check those corner angles.
The Wild Cards: Basement hopper windows, jalousie windows (those glass slat beauties from the 1960s), and modern tilt-turn Euro windows each have proprietary screen systems. If you’re dealing with these, head to a specialty supplier like Metro Screenworks or Quality Screen Company and be prepared to send photos, not just measurements.
Pro Insight for Renters: If you’re renting and the screens are missing or damaged, check your lease before investing in replacements. Some landlords use custom sizes to prevent tenants from swapping them out. Take photos and measurements, then politely email your property manager asking if they have the specs on file. If they don’t, offer to source replacements and deduct from rent, you’ll save them money and get the job done right.
The Foolproof 4-Step Measuring Method
Now we’re in the meat of the operation. Follow these steps like a recipe, and you’ll have measurements that would make a machinist proud. I’ve helped neighbors measure dozens of screens over the years, and this method has a 100% success rate, provided you follow it exactly and don’t succumb to the seductive lie of “eyeballing it.”
Step 1: Remove the Old Screen (If You Have One)
This seems obvious, but you’d be surprised how many people try to measure with the screen in place. Don’t. Remove it gently by compressing the top springs with one hand while lifting the frame from the bottom track with the other. If it’s stuck, resist the urge to yank use a flathead screwdriver to gently pry the tension springs.
Photo-document everything before it comes apart. Snap a picture of the springs, the clips, the spline orientation. When you’re reassembling or ordering new hardware, these photos are worth a thousand curse words. Lay the removed screen on a flat surface like your dining table (cover it with a sheet first those frames are dirty).
Measure the screen itself first, but don’t rely on these numbers. Measure the width at the top, middle, and bottom. Then measure the height at the left, center, and right. Why three times? Because frames warp. Use the shortest width and the shortest height as your baseline. Write these down, then immediately write “OLD SCREEN DO NOT USE” next to them. This prevents the classic mistake of ordering a replacement the same size as your warped, damaged original.
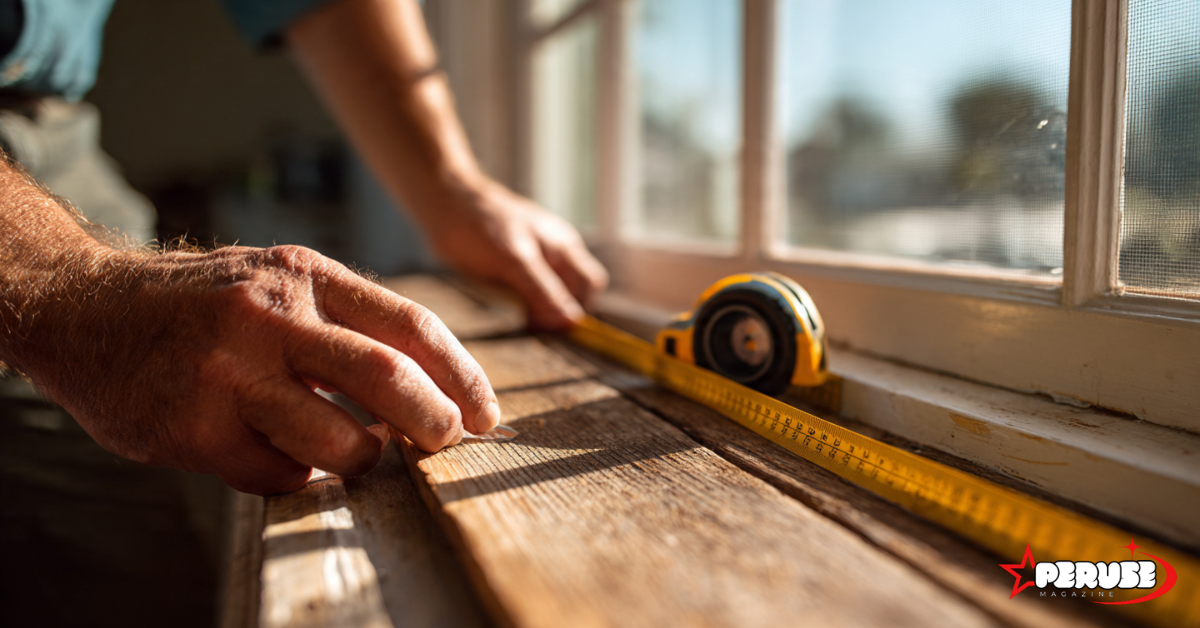
Step 2: Measure the Width
This is where precision makes or breaks your project. For channel-mounted screens (most sliders and double-hungs), you’re measuring the inside dimension of the channel where the screen slides.
Run your tape measure along the top channel from inside edge to inside edge. Do this at three points: left, center, and right. Use the smallest measurement. Now, here’s the critical part: subtract 1/8 inch. This gives you the clearance needed for the screen to slide in without binding.
For lip-style frames (common in older windows), measure from the back of the lip on one side to the back of the lip on the other. This is trickier, you’ll need to angle the tape measure slightly. Again, take three measurements and subtract 1/16 inch for clearance.
Pro Tip: If your channel is more than 1/16 inch out of square (different widths at top and bottom), you may need to order a custom trapezoidal screen. Most people just order the smaller size and shim one side with foam spline, but that’s a temporary fix. For a permanent solution, contact a local metal shop they can fabricate a frame for about $30.
Step 3: Measure the Height
Height measurement follows similar logic, but with one crucial difference: you need to account for tension springs. Measure the left and right channels from the bottom sill to the top track. Use the shorter measurement, then add 1/8 inch for spring clearance if your screen uses them. If it’s a lip-style frame without springs, subtract 1/16 inch instead.
Story from the trenches: My neighbor measured his height perfectly but forgot the spring clearance. When his new screen arrived, he had to compress the springs so aggressively that he bent the frame trying to wedge it in. A $35 screen became a $70 mistake after he ordered a replacement. Don’t be like my neighbor measure twice, add the clearance, and save your frame.
For horizontal sliders, height is often more forgiving, but width is critical. Measure the track height at three points and use the smallest dimension minus 1/8 inch.
Step 4: Check Frame Thickness & Spline Size
This is the step everyone skips, and it’s why so many screens look right but fit wrong. Frame thickness determines which hardware you need, and spline size determines what mesh you can use.
For frame thickness: Slide your caliper (or tape measure in a pinch) into the channel where the frame sits. Common sizes are 5/16 inch, 3/8 inch, and 7/16 inch. This matters because a 5/16-inch frame will rattle in a 7/16-inch channel like a pea in a coffee can.
For spline size: This is the diameter of the rubber cord that holds the mesh in the frame groove. Use your caliper to measure the groove depth. Standard sizes are .140 inch (for standard fiberglass), .160 inch (for pet-resistant screen), and .180 inch (for heavy-duty aluminum). If you’re reusing existing spline, pinch it if it’s brittle and cracks, order new. Flexible spline is reusable; crunchy spline is trash.
Smart Product Mention: If you’re planning to upgrade to pet-resistant screen (highly recommend if you have cats who think screens are climbing walls), you’ll need thicker spline and a spline roller tool. The Saint-Gobain ADFORS pet screen is a reader favorite it’s nearly claw-proof and only adds about $10 to your project cost.
4 Errors That Send 90% of DIYers Back to the Store
Even with a perfect method, human nature finds a way to introduce chaos. These are the mistakes I see most often, learn from them now, or learn from experience later (and experience is more expensive).
1. Measuring the Damaged Screen Instead of the Frame
Your old screen has been baked by the sun, warped by wind, and possibly bent during removal. It’s lying to you. The frame is the truth-teller. Always measure the frame opening, not the existing screen. One neighbor proudly told me he “measured smart” by laying his old screen on top of the new frame in the store to compare. The problem? His old screen was a quarter-inch bowed, so his new one was too. Measure the opening, not the artifact.
2. Forgetting to Subtract the Tolerance
I’ve covered this, but it bears repeating: if you measure 30 inches and order 30 inches, you’ll get a screen that’s 30 inches. The manufacturer assumes you know about clearance. They build to your exact specs. That 1/8-inch gap isn’t a manufacturing error, it’s your installation margin. Write “-1/8” on your notepad next to every measurement so you don’t forget during checkout.
3. Ignoring Corner Variances
Metal frames are rarely perfectly square, especially in houses older than 1980. If one corner is proud by 1/16 inch, your screen will bind there first. Measure diagonally across the frame opening—if the diagonal measurements differ by more than 1/8 inch, your frame is significantly out of square. You can either order a custom screen or use a Dremel to gently file down the proud corner (wear safety glasses and remove the frame from the house first, please).
4. Skipping the Spline Check
You’ve measured perfectly, ordered beautifully, and when the screen arrives, the spline groove is too shallow for your pet-resistant mesh. Suddenly you’re back online ordering .160-inch spline and paying $12 shipping on a $6 part. Measure the groove before you order. Keep a spline sizing chart on your phone Phifer has an excellent PDF guide you can bookmark .
Smart Shopping Tips: Save 30% Without Skimping Quality
Now that you’re a measurement expert, let’s talk strategy. The difference between a $20 screen and a $50 screen isn’t just quality it’s timing, sourcing, and knowing when to DIY versus when to delegate.
The Universal Screen Trick
If you have an odd-size window (looking at you, 1950s ranch houses with 23 7/8-inch openings), consider an adjustable tension screen. These have expandable sides that spring-load into the frame, eliminating the need for perfect measurements. They’re not as sleek as custom screens, but brands like W.B. Marvin make versions that look surprisingly professional. At $25–$30, they’re cheaper than custom and install in under 60 seconds. We featured these in our “5 Small Upgrades That Make Your Home Feel Luxurious” story last spring they’re a renter’s secret weapon.
Bulk Mesh Buying
If you’re replacing several screens, buy mesh by the roll instead of pre-cut pieces. A 36-inch by 84-inch roll of standard fiberglass costs about $15 and covers three to four windows. Pre-cut mesh at the store? $8–$12 per window. The math is clear. Store leftover mesh in a cardboard tube in your garage—it doesn’t degrade if kept dry.
Spline Reuse: The Wine Cork Test
New spline costs about $6 per roll, but if your existing spline is still flexible, you can reuse it. Here’s how to test it: pinch a section between your thumb and forefinger. If it springs back like a wine cork, it’s good. If it stays compressed or crumbles, toss it. If it’s somewhere in between, reuse it on a low-priority window (like the garage) and order new for your main living areas.
Seasonal Timing
Order screens in January or February. Hardware suppliers are slow, and many offer 15–20% off winter orders. Your screens arrive by March, just in time for spring cleaning. Compare that to May, when demand peaks and prices jump 25%. It’s the home improvement equivalent of buying swimsuits in October.
Discover 5 Small Upgrades That Make Your Home Feel Luxurious, including the tension screen trick right here on perusemagazine.com
“Help! My Screen Won’t Snap In” Troubleshooting Common Issues
Even with perfect measurements, the real world intervenes. Frames settle, paint builds up, and channels warp. Here’s how to fix the most common post-purchase problems without ordering another screen.
Too Tight?
If the screen is 1/16 to 1/8 inch too wide, don’t force it. Grab a sanding block with 120-grit paper and gently sand the frame edges. Work slowly, test-fitting every few passes. For metal frames, use a metal file instead. The goal is removing finish and slight material, not reshaping the entire frame. This takes patience but works beautifully.
Too Loose?
A screen that rattles in the wind is nearly as bad as no screen at all. The fix is foam spline padding a thin adhesive foam strip you apply to the frame edge before installing the screen. It adds about 1/16 inch of girth and cushions the fit. You can also upgrade to stiffer tension springs if your frame uses them. Stanwyck Springs sells heavy-duty versions for about $3 each.
Warped Frame?
If your screen frame itself is bowed (this happens with cheap aluminum), place it on a flat surface like your garage floor. Cover it with a towel to prevent scratching, then gently tap the bowed section with a rubber mallet. Work from the center outward, flipping the frame frequently. Check against a straightedge. You can true a frame within 1/32 inch this way, enough for a perfect fit.
The Channel Is Too Shallow
This happens in vintage windows where layers of paint have built up over decades. Use a small paint scraper or a Dremel with a brass brush attachment to carefully remove paint from the channel. Wear a mask, old paint can contain lead. Once the channel is clean, measure again. You might gain a crucial 1/16 inch.
FAQs About Measuring Window Screens
Q: Can I measure without removing the screen?
A: Technically yes, but it’s like trying to measure your waist while wearing jeans—doable but inaccurate. If you absolutely can’t remove it (maybe it’s on the second story and you’re not up for ladder acrobatics), measure the visible frame plus 1/16 inch to account for hidden hardware. Then cross-check by measuring the frame opening from inside the house (if accessible). The numbers should be within 1/8 inch of each other. If they’re not, trust the interior measurement—it’s less exposed to weather warping.
Q: What’s the difference between standard and custom sizes?
A: Standard sizes (like 24×30 inches, 30×36 inches) are mass-produced for big-box stores and fit modern, builder-grade windows. They cost $15–$25. Custom sizes are cut to your exact specs and fit older homes, historical windows, or anything built before standardization took over in the 1980s. They run $35–$60 but fit perfectly. If your measurements end in fractions (like 28 3/8 inches), you’re in custom territory. Don’t round up to the nearest standard size—it never works.
Q: Do I measure the spline groove or the frame edge?
A: Always the frame edge. The spline groove is for mesh tension, not frame sizing. However, you do need to measure the groove depth to order the correct spline diameter. Confusing these two is like measuring your foot length to buy socks related, but not the right metric. Write them as separate numbers: Frame: 28 1/4″ W × 30 1/8″ H; Spline: .160″ depth.
Q: Metric or imperial?
A: Imperial (inches) is the industry standard for U.S. and UK suppliers. Even Canadian manufacturers list sizes in inches. If you’re a metric purist, convert after measuring, but when you order, use inches. It prevents conversion errors and ensures you’re speaking the same language as the cutter. One reader learned this after ordering 71 cm screens that arrived as 71 inches—a $200 mistake that made for a great story at our last reader meetup.
Q: Should I measure all windows at once?
A: Absolutely. Windows from the same manufacturer and era are usually identical, but never assume. I once measured a single window, ordered eight screens, and discovered that two upstairs windows were 1/4 inch narrower apparently the builder used a different supplier for the second floor. Measure every single opening, even if they look the same. It adds 10 minutes to your project and saves hours of returns.
Small Measurement, Big Payoff
There’s something deeply satisfying about a home project that costs less than a takeout dinner but pays dividends every single day. A properly measured window screen doesn’t just keep bugs out it lets fresh air in, reduces your reliance on air conditioning, and eliminates that low-grade annoyance of a rattling, ill-fitting frame that reminds you, every time you open the window, that you’ve been meaning to “fix that.”
In an era where smart home tech promises to revolutionize our lives with $400 thermostats and app-controlled light bulbs, there’s profound comfort in mastering a simple analog skill. Knowing you can measure, order, and install a perfect-fitting screen in under an hour without calling a handyman or watching 12 YouTube tutorials restores a bit of homeowner sovereignty. It’s the difference between living in a space and truly managing it.
Plus, there’s the bragging rights. When your neighbor complains about paying $150 for a single screen replacement, you can casually mention you did all yours for $22 each, and they fit better. That’s the kind of small, smug victory that makes the entire DIY learning curve worth it.
Twenty minutes with a tape measure saves two weeks of waiting for returns. That’s the kind of smart living we’re here for one perfectly fitted screen at a time. So grab that tape measure, channel your inner detail-oriented genius, and turn your window frustration into your next casual dinner party anecdote.