
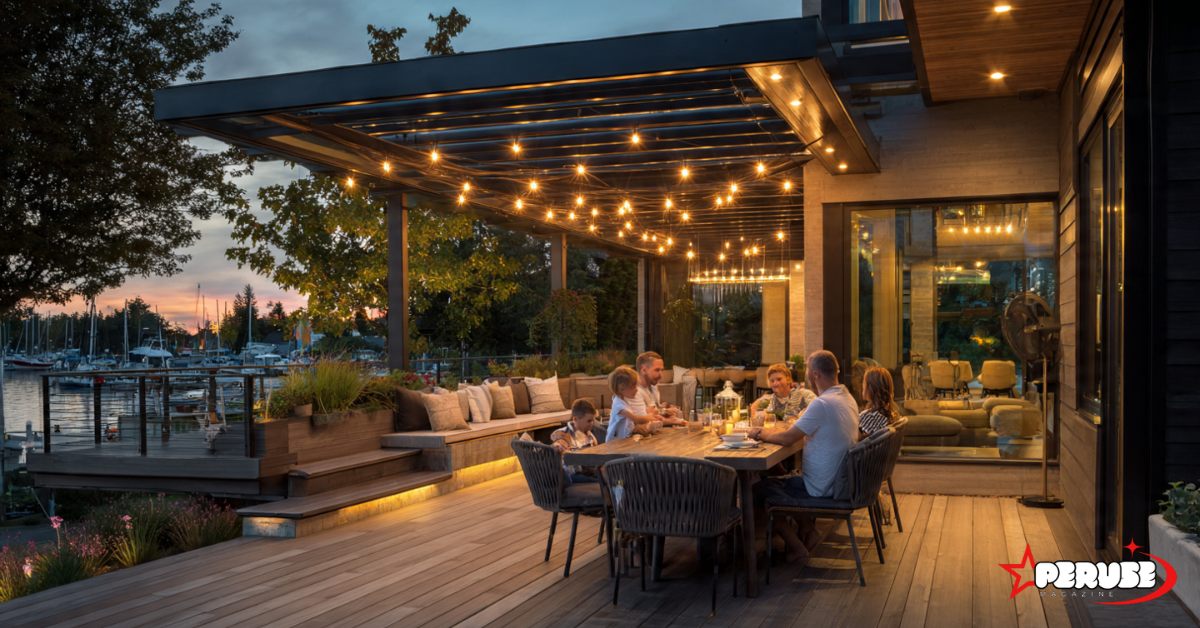
That gorgeous floating deck you pinned last night—the one with the sleek, unsupported 20-foot span and zero visible posts cluttering up your backyard view? It’s not magic, and it’s not some futuristic material only millionaires can afford. It’s LVL, and yes, you absolutely can use it outdoors. But here’s the catch: skip one critical step and that dream deck becomes a soggy, saggy nightmare before you’ve even paid off your credit card.
Laminated Veneer Lumber has been the structural superhero behind commercial buildings and high-end home interiors for decades. Yet most DIYers still treat it like a mysterious contractor-only secret. The truth? LVL exterior use is one of the smartest upgrades you can make to your outdoor living space—if you know how to choose the right grade, read a span chart without losing your mind, and avoid the rookie mistakes that send weekend warriors back to the lumber yard (or worse, the building permit office).
By the time you finish this guide, you’ll be planning your deck beam layout with the confidence of a structural engineer, minus the expensive hourly rate.
📦 Smart Home Info Box
Upgrade Type: Structural/DIY Outdoor Living
Best For: Homeowners building decks, pergolas, or outdoor kitchens; DIYers who want longer spans with fewer posts
Budget Range: $150–$400 per beam (vs. $80–$250 for traditional lumber)
Main Benefit: Longer, stronger spans with zero twisting or warping—keeping your outdoor space level for decades
Editor’s Tip: Always buy H3-treated LVL with a visible stamp. If it looks like regular wood, it’s not rated for exterior use.
What Is LVL and Why It’s a Game-Changer for Exterior Projects
Let’s start with the basics. Laminated Veneer Lumber sounds like something you’d find in a science lab, but it’s actually just wood reimagined. Picture thin sheets of timber veneer, all laid in the same direction and bonded with industrial-strength adhesive under insane pressure. The result? A beam that’s straighter than your accountant’s tie and stronger than traditional lumber of the same size.
The Basics: Engineered Wood 101
Traditional 2x10s are cut from a single tree, which means they inherit all of Mother Nature’s quirks—knots, grain variations, hidden weaknesses that cause twisting and warping the moment moisture shows up. LVL eliminates the lottery. Every sheet is inspected, every beam is consistent. When you’re building a deck that needs to support a hot tub, a dozen friends, and a fully loaded cooler, consistency is your best friend.
Why LVL Crushes Traditional Lumber Outdoors
Here’s where it gets exciting for your backyard project. LVL beams don’t just resist bending better—they barely move at all. While standard timber might twist 1/2 inch over a wet season, LVL holds its shape like a yoga instructor mastering tree pose. That means your deck boards stay flatter, your railings remain plumb, and you’re not rebuilding in five years because everything’s gone wonky.
The real magic for exterior use? Predictable strength. Engineers love LVL because they can calculate exact load capacities without guessing. You love it because you can span longer distances—sometimes 20, 30, even 40 feet—without dropping a post in the middle of your outdoor dining area.
The Exterior Use Catch: Treatment Matters
But—and this is a big but—standard LVL is about as moisture-friendly as a cardboard box. Use interior-grade LVL outdoors, and you’ll watch it delaminate like a bad sunburn. The adhesive fails, the layers peel apart, and suddenly your structural beam has the integrity of a soggy cracker. This is why treated LVL isn’t optional; it’s the entire point.
Treated vs. Untreated: The Exterior Use Non-Negotiable
If you walk away remembering only one thing from this guide, let it be this: untreated LVL outdoors is a demolition project waiting to happen. I’ve seen too many ambitious DIYers pull gorgeous beams off the rack at the lumberyard, build an entire pergola, then cry when it starts splitting after the first rainy season.
H3 Treatment: What It Means and Why It’s Code
When we talk about “treated” LVL for exterior use, we’re specifically referring to H3 treatment (or the American equivalent, UC3B). This isn’t a light spray-on coating. The treatment process forces preservatives deep into the wood fibers—copper azole, alkaline copper quaternary—creating a chemical barrier against rot, fungi, and those tiny insects that treat your deck like an all-you-can-eat buffet.
Building codes don’t mess around here. In the US, the International Residential Code (IRC) requires treated lumber for any structural member within 6 inches of grade or exposed to weather. Canada’s NBC has similar rules. The UK’s BS 8417 standard governs preservative treatment levels. Ignore this, and your building inspector will hand you a rejection slip faster than you can say “span chart.”
Product Spotlight: PWT Treated LVL
One brand that’s earned its stripes in the exterior department is PWT (Pressure-Web-Treated) Treated LVL. This stuff comes with a 25-year limited warranty against structural failure due to decay—a claim regular LVL can’t touch. It carries the UC3B rating, meaning it’s approved for above-ground exterior use, and you’ll spot it by its distinctive olive-green tint and prominent stamp.
I recently talked to a deck builder in Vancouver who swears by it. “Twenty years ago, we’d double up 2x12s and pray they didn’t twist,” he told me. “Now I spec a single 3.5″ x 11.875″ PWT LVL and sleep like a baby. The homeowner gets a cleaner look, I get fewer callbacks.”
Visual Check: How to ID Exterior-Grade LVL
Before you load anything into your truck, do the stamp check. Look for:
- UC3B or H3 marking
- “Exterior Use” or “Treated for Outdoor Applications”
- A treatment quality mark from an accredited agency (ALSC in the US, CSA in Canada)
No stamp? No sale. That “great deal” on Craigslist could be someone else’s rotting mistake.
Understanding LVL Exterior Use Span Charts (The Nerdy Stuff, Simplified)
Let’s be honest—span charts look like someone spilled alphabet soup on a spreadsheet. But once you decode the language, they become your most powerful planning tool. Think of them as the nutrition label for your beam: they tell you exactly what this thing can handle before it starts to bend.
Key Variables: Load, Depth, Width, and Spacing
Load comes in two flavors: dead load (the permanent weight of the structure itself) and live load (everything you add: people, furniture, planters, that enormous inflatable flamingo). For residential decks, building codes typically require a live load of 40 pounds per square foot. That’s like parking a small car on every 10×10 section of your deck.
Depth is the beam’s muscle. A deeper beam spans farther. A 9.5-inch deep LVL is like a lightweight boxer nimble but limited. An 11.875-inch beam is the heavyweight champion. Width (how many plies you bolt together) adds strength like adding more lanes to a bridge.
Spacing between beams matters too. Wider joist spacing increases the load on each beam. Standard deck joists run 16 inches on center, but pushing to 24 inches might require beefing up your LVL size.
How to Read a Span Chart Without Losing Your Mind
Here’s a simplified cheat sheet based on real manufacturer data (think of this as the “speed limit” guide—you’ll still need the official chart for your exact plan):
| LVL Size (Width x Depth) | Approx. Max Span (Uniform Load) | Best For |
|---|---|---|
| 1.75″ x 9.5″ | ~20 feet | Small decks, pergolas |
| 3.5″ x 11.875″ | ~26 feet | Standard 12-16 foot decks |
| 5.25″ x 14″ | ~35 feet | Large spans, commercial vibe |
| 7″ x 24″ | Up to 60 feet | The “go big or go home” projects |
Pro tip: These numbers assume your beam is supporting a uniform load across its entire length. Got a hot tub sitting in one spot? That’s a concentrated load, and math gets complicated fast. Time to call an engineer.
The 40% Rule for Multiple Spans
When you’re running beams across multiple supports (like a 40-foot deck with three posts), the inside span can actually be 40% longer than a simple span. So that 20-foot beam might stretch to 28 feet when it’s properly supported in the middle. It’s like having a friend hold the other end of a heavy board—you can suddenly reach farther without breaking your back.
Deck Dreams: How Far Can Your LVL Beam Really Span?
This is the question that brought you here, so let’s get specific. Your deck’s width and intended use dictate your beam size more than anything else.
For Deck Beams: Typical Spans by Deck Size
12-foot wide deck: You can probably get away with a double-ply 1.75″ x 11.875″ beam. That gives you a 3.5-inch width (two standard LVLs bolted together) and enough depth to span 12-14 feet between posts. You’ll end up with a clean, post-free zone perfect for a dining table.
16-foot wide deck: Now you’re in triple-ply territory. Three LVLs laminated give you 5.25 inches of width, which handles the increased load. Expect spans of 14-16 feet. Want to go bigger? Jump to a 14-inch depth.
Hot tub deck: Stop right here. Any span supporting a hot tub requires an engineer’s stamp. That 4,000-pound water weight plus six soaking-wet friends creates point loads that laugh at standard span charts. Don’t wing it, your homeowner’s insurance will thank you.
For Pergolas and Shade Structures
Here’s where LVL exterior use gets fun. Pergolas carry far less live load, mostly just the structure itself and maybe some hanging plants. That means you can stretch spans dramatically. A single-ply 1.75″ x 9.5″ LVL can easily span 18-20 feet for a pergola beam, giving you that magazine-cover floating-roof aesthetic without a post in your walkway. Just remember: if you plan to hang a swing or heavy lights, recalculate for that extra weight.
For Exterior Headers and Lintels
Replacing a patio door or window in an exterior wall? LVL headers excel here too. A 3.5″ x 9.5″ treated LVL can span up to 8 feet, perfect for most residential openings. The treatment prevents moisture infiltration from siding leaks, a common issue that rots regular headers from the inside out.
Step-by-Step: Planning Your LVL Deck Beam Layout
Ready to move from pinning to planning? Grab a tape measure and a coffee we’re going to sketch this out like the pros.
Step 1: Measure and Mark Your Span
Measure the exact distance between your support posts (or where they’ll go). This is your “clear span.” Now add 6 inches to each end for bearing that’s the minimum 3 inches of beam-to-post contact required by code. Your lumber order length just got 12 inches longer than you thought.
Step 2: Check Local Building Codes
Here’s the reality check: my span chart is a guideline; your city’s building department is the law. Some jurisdictions require engineered drawings for any deck over 30 inches high. Others want a structural engineer’s stamp on spans over 20 feet. A quick call to your local permit office saves you from tearing down a finished deck. Trust me, I’ve seen it happen.
Step 3: Choose Your LVL Size Using a Span Calculator
Most LVL manufacturers (Weyerhaeuser, Boise Cascade, Roseburg) offer free online span calculators. Plug in your deck dimensions, joist spacing, and intended use. The calculator spits back the exact LVL size. It’s like having a structural engineer in your browser except the engineer is free and doesn’t judge your deck party ambitions.
Step 4: Plan for Proper Bearing
Your beam needs solid support. Those 3-inch minimum bearing requirements exist for a reason—too little contact, and the beam crushes the wood plate beneath it. Use steel post caps with proper fasteners (not those flimsy nails from the discount bin). And never, ever let your LVL beam sit directly on dirt or concrete. A proper post-to-beam connector is $15. A collapsed deck is $15,000.
Step 5: Call a Structural Engineer (When to Wave the White Flag)
Call an engineer if:
- Your clear span exceeds 20 feet
- You’re supporting a hot tub, outdoor kitchen, or roof structure
- Your soil conditions are questionable (clay, fill, steep slope)
- You’re not 100% confident reading load tables
This isn’t defeat, it’s smart homeownership. An engineer’s stamp costs $500-$1,000. That’s less than your outdoor furniture budget, and infinitely cheaper than a lawsuit.
Budget Breakdown: LVL vs. Traditional Lumber for Exterior Use
Let’s talk money, because even the smartest upgrade needs to pass the spouse test.
Material Cost Comparison
A treated 2x12x16 pressure-lumber board runs about $35-40. A comparable 1.75″ x 11.875″ treated LVL? $90-120. Ouch, right? But wait, that LVL might let you eliminate a $200 post and a $150 footing. Suddenly the math shifts.
Labor Savings: Straighter Beams = Faster Install
Traditional lumber arrives warped. You spend an hour sorting through the stack at the lumberyard, another hour crowning and culling, then you still end up shimming because nothing’s perfectly straight. LVL arrives straight as an arrow. One builder told me, “I can install an LVL beam in 30 minutes. The same span in traditional lumber? Two hours of fighting, shimming, and swearing.” At $75/hour contractor rates, LVL pays for itself in labor alone.
Long-Term Value: No Warping, Fewer Replacements
That deck you’re building today should last 25 years. Traditional lumber might need beam replacement in 15 if it twists or rots. LVL? The warranty alone guarantees structural integrity for 25 years. Over the life of the deck, LVL is actually the cheaper option plus you get bragging rights for a flawless, post-free design.
Common LVL Exterior Mistakes (And How to Avoid Them)
I’ve made these mistakes so you don’t have to. Learn from my facepalms.
Mistake #1: Skipping Treatment
The Fail: Using interior LVL because “it’s cheaper and I’ll paint it.”
The Fix: Paint doesn’t stop moisture migration. Only H3/UC3B treatment does. Check the stamp, every single time.
Mistake #2: Over-Spanning Without Engineering
The Fail: “The chart says 25 feet, so I’ll go 28 and it’ll probably be fine.”
The Fix: Probably is a terrible structural strategy. Deflection (sag) might not cause immediate collapse, but it will crack your decking and void your home insurance. Stick to the chart or get professional sign-off.
Mistake #3: Ignoring Bearing Length
The Fail: Setting a 20-foot beam on posts with just 1 inch of overhang on each end.
The Fix: You need 3 inches minimum. Less than that, and you’re crushing the wood fibers. Use a wider post or shorten your span.
Mistake #4: Notching or Drilling Improperly
The Fail: Drilling a hole through the center of your LVL to run electrical.
The Fix: LVLs have strict rules about notching and boring. Holes must be in specific zones, and notching is generally prohibited. Check the manufacturer’s guide most allow small holes in the center third, but never within 3 inches of the edge.
Mistake #5: Using Interior Fasteners
The Fail: Grabbing the decking screws you have leftover for your LVL installation.
The Fix: Exterior fasteners must be hot-dip galvanized or stainless steel. Standard screws will corrode, staining your beam and weakening the connection. Spend the extra $20 on the right fasteners.
Smart Design Tips: Making LVL Look Good Outdoors
Let’s be real, LVL isn’t winning any beauty contests. That olive-green treated look is functional, not fashionable. But with a few design tricks, you can hide it or even make it a feature.
Cladding Options: Cedar-Wrapped LVL Beams
The most popular solution? Wrap your LVL in cedar or redwood. Build a three-sided box around the beam, using 1×6 or 1×8 lumber. You get the strength of LVL with the natural wood aesthetic everyone loves. Pro tip: leave a 1/2-inch air gap behind the cladding for ventilation, preventing trapped moisture.
Painted LVL: Prep and Primer Tips
If you’re painting, prep is everything. LVL’s smooth surface needs light sanding (80-grit) to create tooth. Use an oil-based exterior primer designed for pressure-treated wood, then two coats of high-quality acrylic paint. The result is a crisp, modern beam that looks intentional, not like you cheaped out on materials.
Exposed Industrial Look: When to Embrace the Raw Aesthetic
For modern or industrial homes, leave the LVL exposed. The clean lines and uniform texture actually complement steel railings and concrete patios. One architect I follow on Instagram (@ModernFarmhouseLove) used exposed treated LVL for a pergola, staining it dark charcoal. The result was stunningly contemporary and she tagged it as her most-liked post ever.
Editor’s Verdict: Is LVL Right for Your Outdoor Project?
After testing, researching, and watching homeowners actually use this stuff, here’s my honest take:
YES, Use LVL When:
- You’re spanning 12 feet or more between posts
- You want a clean, modern look with minimal supports
- You’re building a pergola, deck, or elevated walkway
- You value long-term stability over initial cost
- You live in a humid climate where lumber twists easily
NO, Skip LVL When:
- Your budget is razor-thin and you’re building a small, ground-level deck (stick with pressure-treated 2x10s)
- You’re installing ground-contact beams (LVL isn’t rated for burial; use treated timber)
- Your design is purely rustic and you want natural wood grain everywhere
- Your span is under 8 feet—overkill doesn’t make sense here
MAYBE, Call an Engineer When:
- You’re mixing materials (LVL with steel, for instance)
- You’re unsure about soil conditions or load paths
- You want to cantilever more than a few feet
FAQs About LVL Exterior Use & Spans
What’s the longest unsupported LVL span for a deck?
For typical residential loads, a 3.5″ x 11.875″ treated LVL can span up to 26 feet. Special-order deeper sections can reach 60 feet, but at that point, you’re in commercial engineering territory.
Can I use regular LVL outside if I paint it?
Absolutely not. Paint is a moisture barrier, not a preservative. Only H3 or UC3B treated LVL is rated for exterior use. Anything else will rot from the inside out.
Do I need an engineer for a 16-foot LVL beam?
Not necessarily, but always check local codes. Many jurisdictions require engineering for spans over 20 feet, or if you’re supporting a roof. When in doubt, a one-hour consultation is money well spent.
Is treated LVL more expensive?
Yes, roughly 20-30% more than interior LVL. But when you factor in labor savings, longer lifespan, and the ability to reduce posts, the total project cost is often a wash or even cheaper.
Small Upgrades, Big Comfort: The Future of Living Starts Outside
Choosing LVL for your exterior project isn’t just about strength. It’s about unlocking design possibilities that traditional lumber can’t touch wider spans for unobstructed views, straighter lines for modern aesthetics, and the peace of mind that comes from knowing your deck will still be rock-solid when your kids are graduating college.
The smartest home upgrades aren’t always the flashiest. Sometimes they’re hidden in the structural bones of your space, doing their job so well you forget they’re there. LVL exterior use is exactly that kind of quiet revolution. It’s the invisible hero behind the floating deck where you’ll host summer barbecues, the pergola where you’ll sip coffee on Sunday mornings, and the outdoor kitchen that makes your house the one everyone wants to gather at.
Would you invest in engineered lumber for a longer-lasting outdoor space—or does the traditional wood aesthetic still win your heart? Let us know in the comments, and share your deck dreams with the community. After all, the best home inspiration comes from seeing what other clever homeowners have built.